This page shows installation of an HX3 mainboard (FPGA based) as a replacement for KeyB Duo sound generator (DSP based). Board is completely remoted by MIDI from KeyB controller. Installation is quite simple, but requires soldering skills and crimping flat ribbon cables.
HX3 Board must be configured with HX3mk3_std.hex firmware with analog inputs disabled (use our USB adaptor cable and HX3 Remote): Set "Organ defaults" parameter 478 to 255 (OFF), Scan Core parameter 477 to "MIDI input" or "FatarScan", respectively. I've not documented audio output configurations, so some experiments with audio jack parameters 438 and 439 might be neccessary. Set MIDI CC Set parameter 435 to 2 (KeyB Duo). All knob/button/drawbar functions are retained, although some have different functions:
KeyB function => HX3 function
EQU BASS => SWELL TRIM CAP
EQU TREBLE => TONE
CROSSTALK => LEAKAGE 0..3
KEYCLICK => PERCUSSION LEVEL
OVERDRIVE => AMP122 VOLUME
STRING BASS => SPLIT ON
See page Using_HX3_with_MIDI_controllers#KeyB_Duo for details of MIDI implementation.
Replacing the KeyB key scan is optional. Installing a FatarScan2 board for direct connection to HX3 yields much lower key latency. See page HX3_Board_Installation#FatarScan2 for details on this topic.
Click pictures to enlarge.
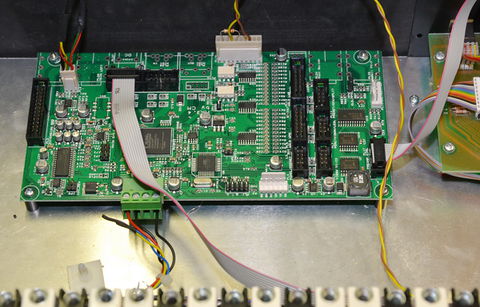
Remove KeyB DSP board and install HX3 board with plastic spacers, using M3 screws. Some holes must be drilled in base plate. Route 10-wire ribbon cable from PL17 PREAMP CTRL to KeyB controller board. Note colors of power supply connector. Only 5V rail (red) and ground (black) is needed, other wires must be insulated. If HX3 only has a 2-pin terminal for power supply, connect both black wires to GND input. 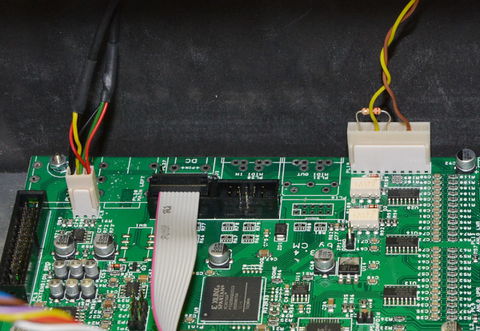
Remove old connectors from cables and install new connectors as shown. Audio cables both connect to HX3 stereo output. Ribbon cable to PL14 is required when using FatarScan2 board for key scanning instead of MIDI input. PLease note strange KeyB color scheme of audio cables. A 220R resistor must be installed on white MIDI connector (10-pin header) to retrieve optocoupler input current. Ribbon cable to PL14 as seen in picture is used for FatarScan option (see below). 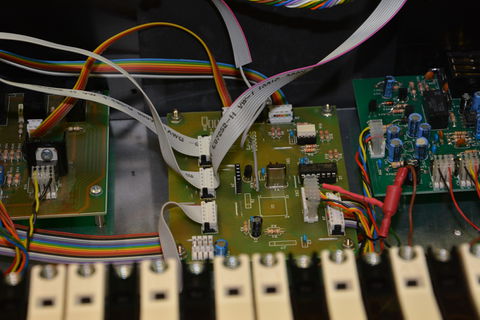
To prevent KeyB to send MIDI data before HX3 is ready to accept, the KeyB Duo controller's RESET signal must be delayed. This is done by using a signal on pin #8 of HX3 PL17 which goes HIGH when HX3 is ready. Solder single wire #8 from ribbon cable to R10 on KeyB controller board as shown. Use R10 pin pointing to U1. Cut off all other wires of PL17 cable. 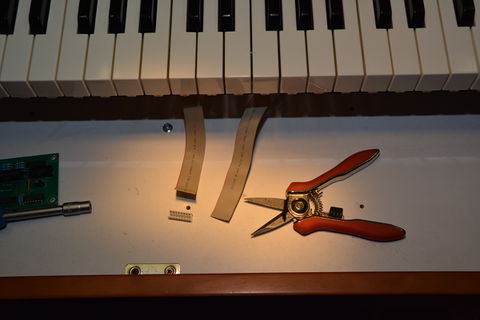
With FatarScan option: Remove lower KeyB keybed and install FatarScan2 board with plastic spacers, using M3 screws. Some holes must be drilled in base plate. Be sure to choose a position that does not collide with keybed parts. 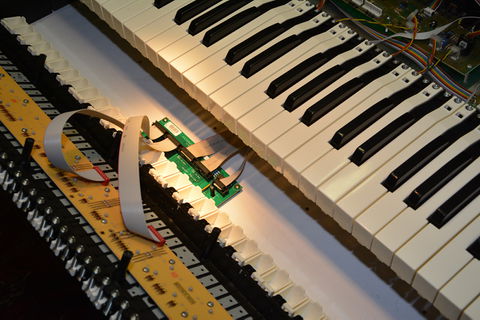
With FatarScan option: Route 10-wire ribbon cable from HX3 PL14 to FatarScan board. Disconnect Fatar keybed cables from KeyB MIDI controller and install 16-pin flat ribbon connectors, pin 1 pointing to coloured wire. Connect 16-pin connectors to FatarScan2 board. Note position of upper/lower notes (matrix section) of Fatar keybeds. 


